
Nodes
Nodes are the main protagonist of designing your narrative.
While each Node type has a unique purpose and capability, they all have some things in common.
Let’s talk about these commonalities first, then I’ll introduce you to each Node type.
The Node Header
Section titled “The Node Header”Every Node, with the exception of Connector Nodes, has a purple header across the top.
At the left, we have the name of the Node type.
To the right of the header (with the exception of Connector and Comment Nodes), the first button will open the Node Editor for that Node.
Next to that, there’s a three-dot button, which will open the Node Menu.
The Node Menu can also be opened by right-clicking the Node’s header.
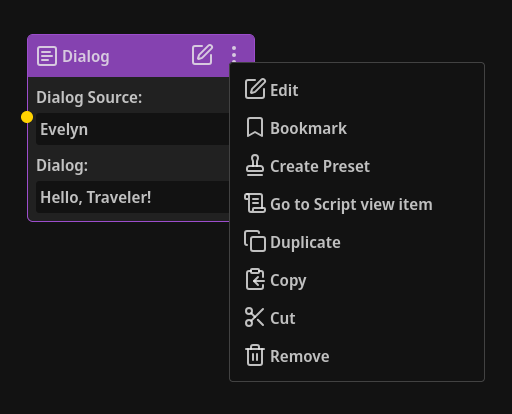
The Node Menu has the following options:
Edit: This will open the Node Editor for this Node in exactly the same way as clicking the edit button in the Node’s header.
Bookmark: This will open a small modal allowing you to bookmark this Node. That bookmark will then be listed in the Node Bookmarks tab in the Left Panel.
Create Preset: This will open a popup allowing you to create a Node Preset based off of this Node and any information you’ve added to it, such as text, properties, variables, etc.
Go to Script view item: This button will switch your view to the Script view, scroll the associated item into view, and highlight it for a few seconds.
Duplicate:
Duplicates the Node. You can also use ctrl+d to duplicate selected Nodes
Copy:
Copies the Node into your “clipboard”, allowing you to paste it elsewhere. You can also use ctrl+c and ctrl+v to copy and paste selected Nodes.
Cut:
Cuts the Node from the current Experience, removing it, and copies its data into your “clipboard”, allowing you to paste it somewhere else in the currently open Experience, or in any other Experience. You can also use ctrl+x to cut selected Nodes.
Please note that cutting a Node removes it, meaning that copying/cutting any other Node(s) after cutting one will permanently overwrite the cut Node’s data in your “clipboard”.
Most of the time you could simply undo until before the Node was cut. Losing data is never fun though, so be sure to watch out just in case.
Remove: This option will permanently remove the Node from the currently open Experience.
Nodes can be moved around by clicking and holding the left mouse anywhere (not just the header), except for on buttons, and then dragging them around. If multiple Nodes are selected, moving one will move all selected Nodes.
To select all Nodes in the currently open Experience, you can use ctrl+a.
You can also hold ctrl when clicking on Nodes to select or deselect multiple Nodes individually.
Inputs, Outputs, and Links
Section titled “Inputs, Outputs, and Links”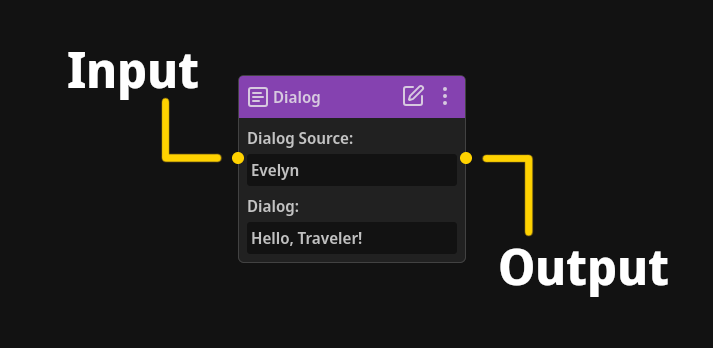
Every Node type, with the exception of the Comment Node, has at least one input or output. Most Node types have both.
The Choice, Conditional, and Probability Node types can have a dynamic amount of outputs.
To link Nodes together, forming a narrative chain, simply click and drag from a Node’s output to a different Node’s input.
Outputs can only connect to one input, while inputs can have any number of outputs linking to it.
To remove a link, simply hover over it with your mouse and give it a right click.
All Node Types And How They Make Your Narrative Stellar
Section titled “All Node Types And How They Make Your Narrative Stellar”Below are all of the Node types and how you use them to craft incredible narrative.
All Node types have attributes: information you enter into specific fields.
All attributes are required for your narrative flow to work (i.e. to not encounter errors), but they don’t have to be filled in right away, so don’t pressure yourself.
In addition, a required attribute that hasn’t been filled in will show up in the Problems tab in the Left Panel as an error or warning, so don’t worry about forgetting to fill something in and losing track of it.
With the exception of the Connector and Comment Node types, which are editable on the Node themselves, all Nodes will simply display the content you’ve entered into them through the Node Editor.
NOTE
Some attributes are indicated below as optional or can be safely left blank.
In addition, if any required attribute won’t be used by your game, you can fill in that attribute with anything (i.e. n/a, gibberish, null, nothing, whatever) and simply ignore that attribute in your game engine.
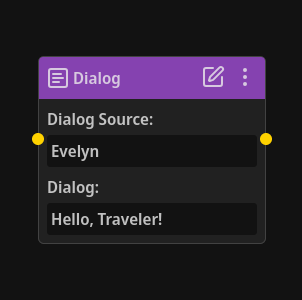
Dialog Node
Section titled “Dialog Node”
Dialog Nodes are the main Nodes you’ll be creating and working with.
This is where you’ll be writing all interactive narrative that isn’t a list of choices or a Data Table item. So nearly all of your awesome narrative will be written in Dialog Nodes.
Thankfully, Dialog Nodes are really simple to use!
The Dialog Node has three attributes:
- Dialog Source
- Dialog
- Properties (optional)
Dialog Source
Section titled “Dialog Source”You know how when a character is talking in games, their name is often displayed somewhere nearby what they’re saying, indicating to the player who is talking?
This is often seen in RPGs, next to subtitles, dialogue boxes, etc.
The Dialog Source attribute represents this.
Dialog Source isn’t just for characters though.
For example, let’s say you wanted to display a series of dialog boxes as a tutorial. You could put “Tutorial” or even the name of the concept you’re teaching the player as the Dialog Source.
Dialog
Section titled “Dialog”This displays the dialog you’ve entered for this Node.
This can be what a character says, the words in a book, the next part of a tutorial, information on a computer terminal, the description of the next step in a quest, etc.
NOTE
Dialog vs. Dialogue.
Why is the term “Dialog” used in NarrativeFlow instead of “Dialogue”?
It’s because NarrativeFlow is for designing ALL narrative and text-based information, not just conversations between characters.
For example, say a character is reading information on a computer or in a book.
Those are cases where the player is interacting with non-conversation (non-dialogue) narrative, but is interacting with the game’s world and interface (i.e. a dialog).
Put simply, “dialog” encompasses all text-based narrative and information, matching NarrativeFlow’s powerful capabilities (which is much more than text-based), while “dialogue” usually only represents conversations.
Properties
Section titled “Properties”If any Properties have been added to a Dialog Node, below the Dialog Source and Dialog attributes, you’ll see a button with a down arrow that allows you to reveal any Properties that have been added to that Node.
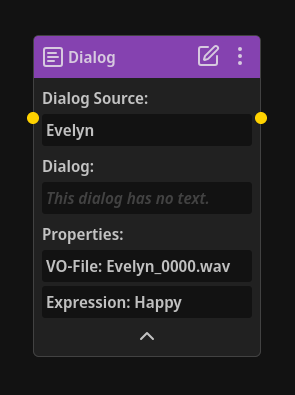
If Properties are already expanded, you can easily collapse them by hitting the same button.
TIP
Properties are a powerful way of attaching data, files, etc. to narrative-content Nodes. Learn all about Node Properties here!
Choice Node
Section titled “Choice Node”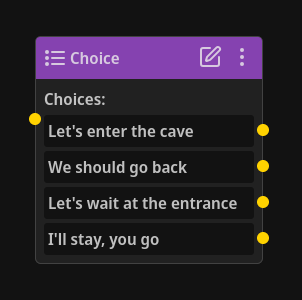
Choice Nodes allow you to create any amount of choices to be selected by your player. You get to define the number of choices and the text associated with each choice.
Choice Nodes has the following attributes:
- Choices
- Properties (optional)
Choices
Section titled “Choices”With Choice Nodes, you can create any number of choices you want. You’ll see a list of all the choices created for this Node here.
Properties
Section titled “Properties”If any Properties have been added to a Choice Node, below the list of choices, you’ll see a button with a down arrow that allows you to reveal any Properties that have been added to that Node.
If Properties are already expanded, you can easily collapse them by hitting the same button.
TIP
Properties are a powerful way of attaching data, files, etc. to narrative-content Nodes. Learn all about Node Properties here!
Start Node
Section titled “Start Node”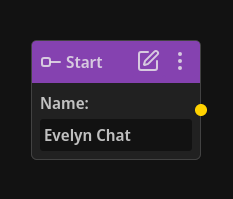
Start Nodes allow you to define where in your narrative/Node chain you’d like to be able to start at.
For example, you could have one Start Node lead to a one-time greeting for when the player meets a new character, and another Start Node that leads to regular conversation as friends.
Each Experience must have at least one Start Node. You can certainly create more than that in any Experience though if you want.
Start Nodes have two attributes:
- Name
- Properties (optional)
The name attribute is simply the unique name for that Start Node.
This is important because only named Start nodes will show up as valid destinations for Teleport Nodes.
In addition, this name is what you’ll use to tell your game engine where to start a specific narrative chain.
IMPORTANT
Each Start Node within an Experience must have a unique name, but Start Nodes in different Experiences can have the same name.
Properties
Section titled “Properties”If any Properties have been added to a Start Node, below the name, you’ll see a button with a down arrow that allows you to reveal any Properties that have been added to that Node.
If Properties are already expanded, you can easily collapse them by hitting the same button.
End Node
Section titled “End Node”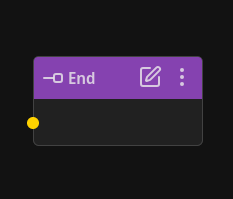
All narrative/Node chains must eventually reach an End Node.
End Nodes are simply a way to signal to your game engine that the end of a narrative chain was reached. Your game engine can then react accordingly.
For example, let’s say you’re in a conversation with a character.
After some dialogue between the two of you, you say goodbye.
An End Node is reached by your game engine, so it knows to leave the conversation state.
End Nodes have just one attribute:
- Properties (optional)
Properties
Section titled “Properties”If any Properties have been added to an End Node, you’ll see a button with a down arrow that allows you to reveal any Properties that have been added to that Node.
If Properties are already expanded, you can easily collapse them by hitting the same button.
Variable Node
Section titled “Variable Node”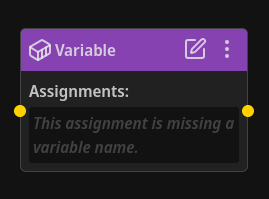
Any state you wish to change, influence, or keep track of can be done so with Variables.
And Variable Nodes are how your narrative chain can interact with Variables.
For example, let’s say you want to keep track of whether a player selects choice A or choice B on a certain Choice Node.
You could store that in a variable called “Did Player Choose A Or B” that you created in the Variables Modal.
After your Choice Node, the choice the player made can be saved in that variable through Variable Nodes.
You can then use that variable to dynamically influence the narrative anywhere in your narrative (or even in your game engine).
Variable Nodes have only one attribute:
- List of all assignments
Assignments
Section titled “Assignments”Each assignment consists of a variable, an operator (set to, increase by, decrease by, etc.), and a value.
For example, Reputation + 15.
Let’s say you want to have special dialogue/narrative for the first time the player meets new characters.
You can easily accomplish this with something like the following after the player experiences their first-time meeting with a character: Has Player Met ___ = Yes.
Then, when the player talks to a character, you could use a Conditional Node to check if the player has already met them and take a different narrative branch depending on the result of the check.
Conditional Node
Section titled “Conditional Node”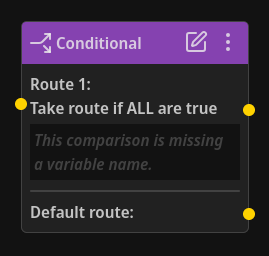
Conditional Nodes allow you to change the route/branch your narrative flow takes based on the result of one or more comparisons.
Each comparison usually involves comparing a variable against text, a number, true or false, or even another variable.
Conditional Nodes have just two attributes:
- List of routes and an output for each
- The current mode of the route
- List of all comparisons in the route
- Default route
Routes
Section titled “Routes”Each route can have as many comparisons as you need, and you can add as many routes as you want.
Whether a route is taken or not is determined by a combination of the comparisons and the mode of the route.
From first to last, the first route that has all, any, or none (can be decided by you) of the comparisons equate as “true” will be taken by the narrative flow.
If none of the routes are valid (i.e. their comparisons didn’t “equate to true”), the default route is taken.
Route Mode
Section titled “Route Mode”A route can have one of the following modes:
- All - route will be taken if ALL of the comparisons equate to true
- Any - route will be taken if ANY of the comparisons equate to true
- None - route will be taken if NONE of the comparisons equate to true
Comparisons
Section titled “Comparisons”Each comparison consists of a variable, an operator (equal to, less than, greater than, etc.), and a value.
Let’s use the following example: Reputation > 30.
If this is the only comparison in a route, the route’s mode is set to all or any, and Reputation is currently greater than 30, than that route will be taken.
If the route’s mode was set to none, then the route would not be taken.
In that case, if this is the only route, the default route would then be taken instead (because none of the routes were considered “valid”).
The “value” part of comparisons doesn’t have to be limited to static numbers or text.
You can compare variables to other variables.
For example, you could have characters say something special on the player-character’s birthday (think Stardew Valley) by using a comparison like this: Player's birthday = Current day.
And in this example: Can Player Access Special Dialogue = Did Player Choose ___, perhaps there is special narrative that the player can only experience if they made a specific choice elsewhere in your story/game.
You could also easily have special dialogue for the first time the player meets a character: Has Player Met Shop Owner = No.
Default Route
Section titled “Default Route”If all routes are considered “invalid”, the default route will be taken.
The default route must be linked to another Node to avoid errors, even if you know that one of the routes above will always be valid.
If you don’t want/need a separate branch specifically for a default route, you could always link your default route to the destination of one of your other routes.
In other words, you can connect your default route to anywhere in your Experience. You don’t have to create a branch specific for each default route of every Conditional Node.
Probability Node
Section titled “Probability Node”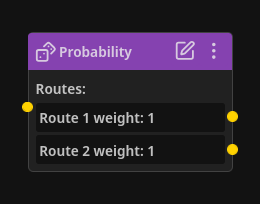
If you’d like to have some weighted randomness in your narrative where certain branches have a higher, lower, or equal chance of being taken, then the Probability Node is perfect for this.
The Probability Node has just one attribute:
- List of routes with the weight and output for each
Routes
Section titled “Routes”For each route, you can either use a static number for how much “weight” it has (the likelihood that a route will be taken), or you can use a variable, in which case the value of that variable will be used at runtime to determine a route’s weight.
Function Node
Section titled “Function Node”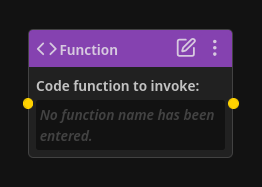
The Function Node allows you to call any function, method, routine, script, logic, etc. that you’d like to signal to your game engine to run.
If you don’t need this advanced functionality, you can simply ignore this Node type. No hard feelings.
Function Nodes have just one attribute:
- Statement (labeled “Code function to invoke”)
Statement
Section titled “Statement”This is the exact text that will be passed to your game engine to parse and react accordingly.
Teleport Node
Section titled “Teleport Node”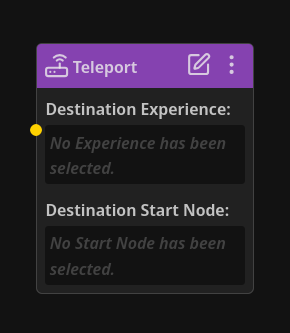
While designing your narrative, you may find that you need to jump from one Experience to another.
This can be done easily and seamlessly with Teleport Nodes.
Teleport Nodes allow you to jump (or “teleport”) from it to a Start Node that you pick within a different Experience.
Or, if you need your narrative to jump from one Node to another Node far away in the same Experience, you can also choose a Start Node destination within the same Experience.
Teleport Nodes have two attributes:
- Destination Experience
- Destination Start Node
Destination Experience
Section titled “Destination Experience”This is the Experience that contains the Start Node you’d like to jump (or “teleport”) to.
This can be any Experience in your project, including the Experience the Teleport Node is in.
Destination Start Node
Section titled “Destination Start Node”This is the exact Start Node your narrative will seamlessly teleport to.
Connector Node
Section titled “Connector Node”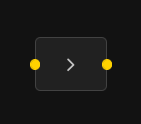
Links between Nodes can become quite intertwined over time, especially with deep, complex, non-linear narrative.
We can use Connector Nodes to reduce or eliminate tangled messes.
Connector Nodes do not effect your narrative in any way. They simply help you organize and route your links between Nodes.
The best part is you can freely switch the flow direction of Connector Nodes.
This means that if you need to connect a later Node with a Node earlier in your chain, you can elegantly and clearly link these Nodes together with one or more Connector Nodes, allowing you to avoid errors, confusion, and tying a knot with links.
The flow direction of Connector Nodes can be switched simply by clicking the > button (< if it’s already been switched) on the Node.
The links will automatically switch sides respectively for you when clicking this button.
Comment Node
Section titled “Comment Node”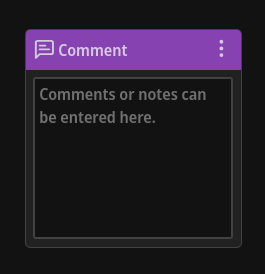
The Comment Node is exactly what it sounds like.
It allows you to write any notes you might have about your narrative, the flow, branches, etc. and position that comment exactly where it’s relevant.